
Proper Walking Lunge Form at Home Without Hurting Your Knees
That sharp twinge in your knee during a walking lunge isn’t normal—it’s a warning sign. Most of us rush into this powerful move without the foundation it demands, inviting pain instead of strength.
When executed correctly, this single movement fires up your glutes, quads, hamstrings, and core. It’s a powerhouse for building lower-body strength. But get the angles wrong, and your joints pay the price.
The biggest mistake? Leaping forward before you understand the mechanics. This creates bad habits that lead to chronic issues. Your front knee should never shoot past your toes, and both knees must hit a 90-degree angle at the bottom. Keep your torso upright, shoulders back, and abs engaged.
You don’t need a gym. With focus on alignment, you can transform a hallway into a strength-training zone. This guide gives you the actionable steps to master the movement, protect your knees, and build resilient legs.
Key Takeaways
- Correct technique is non-negotiable for protecting your knee joints during exercise.
- The walking lunge engages your glutes, quadriceps, hamstrings, calves, and core muscles simultaneously.
- Achieving a 90-degree angle in both knees at the lowest point is critical for safety.
- Maintaining an upright torso with your spine straight ensures proper spinal alignment.
- This exercise can be performed effectively in your own living space without any equipment.
- Rushing the movement is the primary cause of injury and ineffective training.
- Understanding the “why” behind each step promotes long-term joint health and athletic performance.
Understanding the Role of Lunges in Lower Body Training
What if one exercise could simultaneously build strength, improve balance, and reveal muscle imbalances? That’s the power of a well-executed lunge. It’s a cornerstone movement for developing resilient, functional legs.
The muscles targeted by lunges
This movement is a full-team effort. Your glutes and quadriceps act as the primary drivers, generating the force to push you back up. Your hamstrings and calves engage to control the descent and stabilize your joints.
Even your core and hip flexors get in on the action. They work to keep your torso upright and manage your range of motion. This comprehensive recruitment is why lunges are so efficient for lower body development.
Benefits of unilateral exercises for balance and strength
Lunges are unilateral. You train one side of your body at a time. This forces your stabilizing muscles to engage, building coordination and real-world strength.
Think about daily life—climbing stairs or stepping off a curb. These are single-leg actions. Unilateral training prepares your body for these demands. It also highlights and corrects strength differences between your left and right side.
You’re not just working major muscles. You’re building a balanced, injury-resistant physique that performs.
Why Technique is Crucial for Safe Lunging
Every time you step into a lunge, you’re making a choice between building strength or inviting damage. This movement seems simple, but that’s the trap. Rushing through it without focus welcomes bad habits and injury.
Impact of Improper Form on Knee Health
Here’s the hard truth. Poor technique doesn’t just waste your effort. It actively harms your joints over time.
Repetitive stress from misaligned knees adds up. It can lead to patellar tendinitis or meniscus issues. When your front knee shoots past your toes, you place a damaging shear force on the joint.
That’s not a sustainable loading pattern. Do it enough, and you risk inflammation and cartilage wear. Your knees don’t care how tough you are—physics wins every time.
Long-Term Advantages of Correct Posture
Good form is about respecting your body’s biomechanics. It sets you up for decades of pain-free training.
When you maintain proper alignment, you load the muscles that should work. You don’t stress passive structures like ligaments. This maximizes muscle activation so you get stronger faster.
Think long-term. The way you train today determines how you move at 50 or 60. Invest in technique now for lifelong joint health and performance.
If you feel pain during a lunge, listen. It’s a clear message to address mobility limits or seek guidance.
Mastering Proper Walking Lunge Form at Home
Walking lunges demand more than just strength—they require coordination, balance, and unwavering focus. This dynamic version takes the foundational forward lunge and adds motion. You perform one rep, then step into the next, traveling in a straight line.
Think of it as the logical next step after nailing stationary lunges. Don’t rush this progression. If your static technique is shaky, moving will magnify every flaw. Master the basics first to build a solid foundation.
The best part? You can do this anywhere. No gym or special gear is needed. A clear hallway or a 10-foot path is your training zone. Your own bodyweight provides the perfect challenge to start.
What you must bring is a commitment to quality. Performing walking lunges with poor mechanics is counterproductive. You risk ingraining bad patterns that lead to injury. Precision protects your joints and makes the movement effective.
This is where we get into the details. We’ll break down every component: from your initial step length to maintaining control when you’re tired. Approach this like a skill. Be patient, move deliberately, and let speed develop naturally later.
Your body is capable of incredible adaptation. Learning this movement correctly unlocks new levels of lower-body power and resilience. Let’s build that foundation together.
Basic Components of a Safe Walking Lunge
Before you take a single step, your setup determines the safety and effectiveness of the entire movement. It’s about precise geometry and conscious muscle engagement.
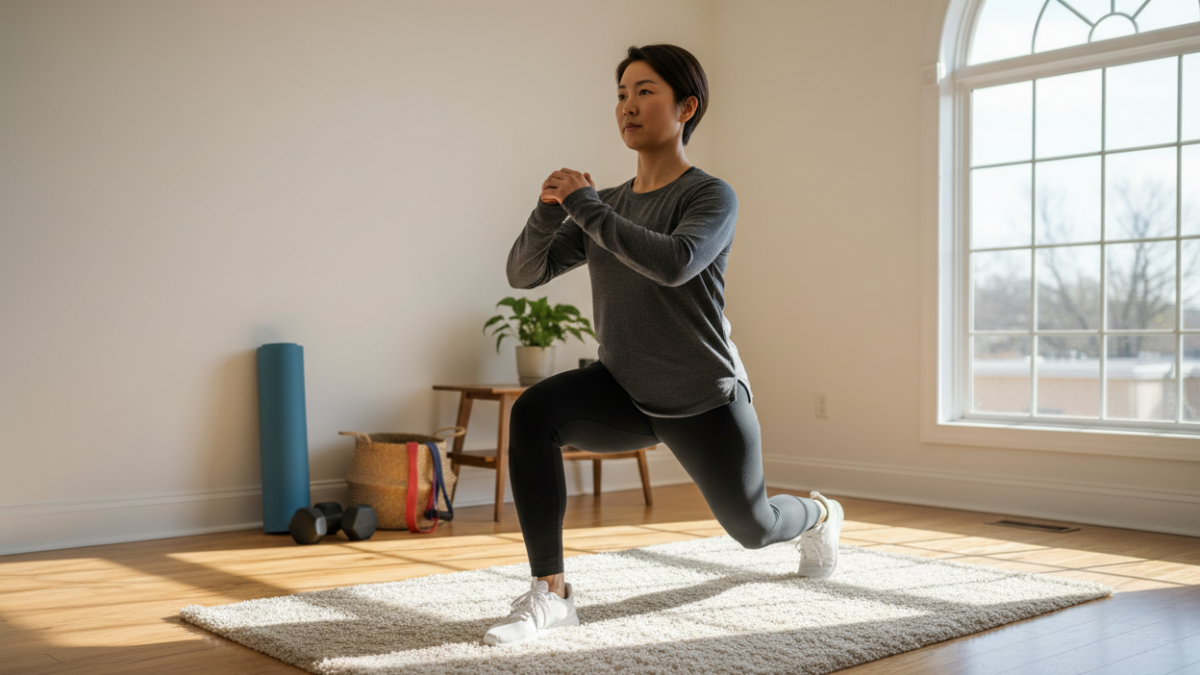
Foot Placement and Step Length
Start with your feet hip-width apart. This isn’t a suggestion—it’s your stable base. A narrow stance creates a wobbly tightrope.
When you step forward, think “railroad tracks, not tightrope.” Your front foot should land in front of your hip, not in line with your back leg. This lateral spacing is crucial for balance.
Your step length is a Goldilocks game. Too short, and you can’t hit 90-degree angles. Too long, and your back knee can’t bend. Aim for a distance where both knees form perfect right angles at the bottom.
Knee Alignment and Core Engagement
At that lowest point, check your knee position. Your front knee must be directly above your ankle. If it shoots past your toes, you’re stressing the joint.
Your back knee should hover a few inches off the floor. This protects both bent knees.
Core engagement isn’t optional. Brace your abs before you move. This creates a rigid cylinder around your spine, preventing your torso from collapsing. It’s a foundational skill for all anti-aging exercise tips focused on stability.
Your foot position on the ground matters too. Drive through the heel of your front foot. Keep your back foot on the ball, heel up. These components work as one system.
Setting Up Your Home Workout Space for Lunges
Transforming a corner of your home into a safe training zone requires just a few smart adjustments. You don’t need a gym membership or fancy gear. What you do need is a dedicated space that supports good technique and keeps you consistent.
First, find a clear path. You need about 10 to 15 feet to move in a straight line. A hallway is perfect. A living room with furniture pushed back works too. The goal is an unobstructed lane for your movement.
Your floor surface is a big deal for stability. Slipping is a fast way to get hurt. Check the table below to pick the best surface for your workout.
| Floor Surface | Traction Level | Stability for Lunges | Best Use Case |
|---|---|---|---|
| Hardwood or Tile | High | Excellent | Ideal for barefoot or shoe training. |
| Low-Pile Carpet | Medium-High | Good | Provides solid footing without being too soft. |
| Plush Carpet | Low | Poor | Can make balance tricky. Add a yoga mat on top. |
| Yoga Mat | High | Very Good | Creates a firm, defined surface on any carpet. |
Always sweep your floor first. Remove pet toys or loose rugs. If you’re new to this exercise, stand near a wall. It’s a confidence boost if you wobble.
Good lighting helps you see your body in a mirror or window. This lets you check your alignment. Turn off the TV and put your phone away. Focus is key for learning.
Keep the room at a comfortable temperature. You want muscles warm, not sweaty palms. A smart setup makes your workout safer and more effective. It’s the first step in any solid calisthenics workout plan.
Step-by-Step Guide to Performing the Walking Lunge
Let’s translate theory into action with a precise, step-by-step blueprint for the walking lunge. Think of this as your real-time coaching script. Follow each cue to build muscle memory and protect your joints.
Step forward with controlled movement
Begin in your athletic stance. Your feet are hip-width apart. Your core is braced and your shoulders are back.
Now, initiate the step forward. Lead with your right leg. Your foot should contact the ground heel-first. Do not step and then lower. The lowering movement begins the instant your foot lands.
Descend straight down. Your torso stays vertical. Your hips drop between your legs. Your back knee bends toward the floor.
Hit the bottom position. Pause briefly. Check your work. Both knees should be at 90-degree angles. Your front knee is stacked over your ankle.
Transitioning between steps smoothly
This is the dynamic part. Drive up through the heel of your front foot. Engage your glute and quad to power the ascent.
Do not step backward. Instead, swing your back leg forward. Your body will balance on one leg for a split second. Keep your core tight to prevent leaning.
Plant your left foot ahead. You are now descending into the next rep. The rhythm is fluid: down, up, step through.
Keep your hips pointing straight ahead. A consistent tempo is key. Do not rush when you get tired.
| Phase | Key Action | Sensory Cue | Common Error |
|---|---|---|---|
| Initiation | Step forward heel-first | “Step and lower together” | Striding too far |
| Descent | Drop hips straight down | “Sit between your feet” | Leaning torso forward |
| Bottom Position | Pause and check angles | “Knees at right angles” | Front knee past toes |
| Ascent & Transition | Drive up and step through | “Push, don’t pull” | Collapsing the core |
Enhancing Knee Safety and Alignment While Lunging
Why does a 90-degree angle matter so much? It’s the key to distributing force safely across your muscles and joints. This precise geometry protects your knees from harmful shear forces. It’s your primary defense against pain during any lower-body movement.

Maintaining a 90-degree angle in both knees
At the bottom of your lunge, both knees must form right angles. Your front knee should stack directly above your ankle. If it shoots past your toes, you’re loading the joint incorrectly.
Check your back knee too. It should hover 2-4 inches from the floor. This position ensures your glutes and quads are working hard. If your back leg is too straight, your step was too short. Fix your stride to fix the angles.
Using walls and props for added support
Struggle with your front knee drifting forward? Use a wall. Place your toes a few inches from it. When you descend, the wall provides instant feedback. If your knee touches, you’ve gone too far.
This technique works for all levels. It reinforces perfect mechanics under load. For balance support, hold a sturdy chair or use TRX straps. There’s no shame in smart assistance.
If you have existing knee issues, try stepping backward. A reverse lunge naturally limits how far your front knee can travel. It reduces stress while building the same strength.
Perfecting Your Body Mechanics During Lunges
Posture isn’t just about looking good—it’s your body‘s power transmission system. A misaligned torso steals force from your legs and dumps stress into your joints. Your upper half must be a stable platform.
Keeping your torso upright and spine aligned
Think “proud chest.” Point your sternum forward. Pull your shoulders back and down. This sets your spine in a strong, neutral position.
Your gaze matters. Looking down pulls your head forward. This rounds your upper back. Keep your eyes on the horizon ahead.
Engage your core before you move. Brace your entire trunk. This creates a rigid cylinder that protects your spine.
| Postural Cue | Internal Feeling | Common Error |
|---|---|---|
| “String pulling head up” | Tall through the neck | Chin dropping to chest |
| Shoulders level | Balanced weight | One shoulder hiking up |
| Neutral spine | Natural lower back curve | Excessive arch or rounding |
| Breathe into belly | Core stays braced | Holding breath, collapsing |
Fatigue will test you. Your body wants to lean forward to cheat. Fight it. Reset your posture between every rep. A stable torso is your foundation for power.
Common Mistakes to Avoid in Walking Lunges
Even seasoned athletes can sabotage their progress with a few critical errors during walking lunges. These flaws turn a strength-building movement into a joint-stressing habit. Let’s fix them now.
Overstepping and excessive forward knee movement
The overstepping error is widespread. You take a huge stride, thinking it increases range. This prevents your back knee from bending to 90 degrees.
Your back leg stays nearly straight. You’re doing a single-leg squat, not a lunge. The correction is simple.
Take a step that allows both knees to hit right angles. For most, this is about 2.5 to 3 feet. Watch your front foot placement.
It must land in front of your hip, not in line with your back leg. Keep hip-width spacing for balance.
Rushing through reps is another major fault. Treating lunges like cardio sacrifices control. Each movement should be deliberate.
Follow a one-second down, pause, one-second up tempo. This keeps tension on the muscles.
Ensure your front foot stays flat. If your heel lifts, you lose power. Every step should be consistent in length and width.
Listen to your body. If one side feels different, address the asymmetry. Don’t push through blindly.
Variations and Modifications for Different Fitness Levels
Building lower-body strength is a ladder, and choosing the right rung for your level is crucial for safety and results. Not everyone should begin with dynamic walking lunges. Your starting point depends on your experience, mobility, and any past injuries.
Smart progression prevents frustration and protects your joints. The goal is to build a resilient foundation before adding complexity or load.
Introducing reverse and stationary lunges
If you’re new to this movement pattern, start with a stationary lunge. This is also called a split squat. Your feet stay planted.
This removes the balance challenge of stepping. You can focus entirely on hitting those 90-degree angles. Master this static position first.
The forward lunge is your next step. You step out and then return to the start. It introduces movement control without continuous travel.
For anyone with knee sensitivity, the reverse lunge is often a game-changer. Stepping backward naturally limits how far your front knee can travel.
This reduces stress on the patellar tendon. Many find reverse lunges far more comfortable.
Adjusting intensity with weights or added movements
Once bodyweight walking lunges feel solid, you can add resistance. Do not rush this step. Perfect mechanics under load is key.
Common weighted variations include dumbbells at your sides or a single weight held at your chest. A barbell is for advanced athletes.
External weight amplifies every flaw. Spend months mastering the pattern first.
Beyond weights, explore other exercises like lateral or curtsy lunges. Each challenges your body in a new plane of motion.
Plyometric or tempo variations are for later stages. Follow the progression ladder below to climb safely.
| Variation | Movement Complexity | Best For | Progression Signal |
|---|---|---|---|
| Stationary Lunge | Low (Static) | Beginners, mastering angles | 3 sets of 12 with perfect form |
| Forward Lunge | Medium (Step & Return) | Learning stepping control | Controlled reps with no wobble |
| Reverse Lunge | Medium (Step Back) | Knee sensitivity, balance | Pain-free movement for 15 reps |
| Walking Lunge | High (Continuous) | Dynamic strength, coordination | 20 smooth reps per leg |
| Weighted Variations | High + Load | Building maximal strength | Bodyweight form is flawless |
Harnessing Core, Leg, and Glute Engagement
Mastering the mind-muscle connection ensures your glutes and core do their job, not your joints. You must consciously recruit specific groups.
Understanding which muscles should fire increases effectiveness and safety. Your brain directs the power.
Integrating core activation for stability
Your core muscles are the foundation. They prevent rotation and keep you upright.
Before each rep, breathe into your belly. Then brace your abs like you’re about to be punched. Hold that tension.
This creates intra-abdominal pressure. It stabilizes your spine under load.
At the bottom of the movement, think about squeezing your glute on the front leg. Drive up through that hip extension.
Your quads are the primary movers. You’ll feel the burn in your front thigh.
Hamstrings assist on both legs. The sensation is subtler but vital.
| Muscle Group | Primary Function | Mental Cue |
|---|---|---|
| Glutes | Hip extension, power | “Squeeze your cheek to stand” |
| Quadriceps | Knee extension, drive | “Push the floor away” |
| Core Muscles | Spinal stability, anti-rotation | “Brace for a punch” |
| Hamstrings | Knee flexion, assist hip | “Pull your heel toward glute” |
| Hip Stabilizers | Pelvis level, knee alignment | “Keep hips square” |
Your hip stabilizers work overtime. They keep your pelvis level and stop knee cave.
Calves and ankles maintain foot position. Feeling fatigue there is normal.
Unilateral leg work forces coordination. Each side must handle its load.
Listen to muscle sensation. If you feel it in your knees, adjust your form. Your body gives clear feedback.
Integrating Walking Lunges into a Balanced Workout Routine
Isolating walking lunges limits their power. They thrive within a structured lower body session.
Your routine needs intelligent design. For most people, two to three sessions per week works best. This provides stimulus for growth while allowing recovery.
Complementary Lower Body Exercises
Pair this movement with other foundational drills. Squats and deadlifts are perfect partners. They are bilateral moves for heavy loading.
Walking lunges address unilateral strength and balance. This combination hits all major muscle groups and movement patterns.
Start with smart volume. Beginners should aim for two to three sets of six to eight reps per leg. As you build capacity, progress to three sets of ten to fifteen.
Placement in your workout matters. Perform them early when you’re fresh and can concentrate. If you’re squatting heavy, do those first.
These lunges can also serve as a finisher. Use lighter sets at the end to exhaust muscles. Never let fatigue ruin your mechanics.
Track your progress in a log. When you hit the top of your rep range easily, increase the difficulty. Add more reps, sets, or external load.
Rest about sixty to ninety seconds between sets. This keeps the session moving while allowing partial recovery.
This approach builds a resilient, functional physique. It works for weight loss, toning, or pure strength training.
Tips for Increasing Flexibility and Preventing Injury
Flexibility is the silent partner to strength, dictating how safely your body can perform. Tight hips or stiff ankles force your joints into bad positions. This compensation is a direct path to injury.
Hip flexor tightness is a major culprit. It limits your range of motion and strains your lower back. Dedicate 5-10 minutes to mobility work before your session.
Test your ankle mobility at a wall. If your heel lifts, you need more dorsiflexion. Glute activation drills like bridges prime your muscles to fire correctly.
Never skip warm-up sets. They prepare your nervous system and muscle tissue for the work ahead. This is a core principle of smart ergonomic tips to make your home workouts safer and more.
Recovery is non-negotiable for long-term health. Sleep, nutrition, and stress management build a resilient body. Listen to your body’s signals.
Sharp pain is a red flag. If discomfort persists despite good technique, seek professional advice. Progress slowly, increasing volume by no more than 10% weekly to protect your joint health.
| Mobility Area | Quick Test | Corrective Drill |
|---|---|---|
| Hip Flexors | Can you achieve a deep stride without arching your back? | Kneeling hip flexor stretch, 30 sec per side |
| Ankles | Knee to wall test without heel lift | Wall ankle mobilizations, 10 reps |
| Glutes | Do you feel your glutes burn during the movement? | Glute bridges, 2 sets of 15 reps |
Building Long-Term Lower Body Strength and Function
Think of each precise stride not as an isolated exercise, but as a brick in the foundation of your lifelong mobility. This movement pattern builds a body that performs in real life.
The fundamentals are your blueprint. Start with your feet hip-width apart for balance. Control your descent to protect your joints.
These principles don’t change. They apply whether you use bodyweight or add external weight. When you hold dumbbells, start very light.
The strength you build this way is functional. It supports your back and keeps you independent. Chase quality in every rep.
Your consistent work today invests in your strength for decades. Now, go build that foundation.