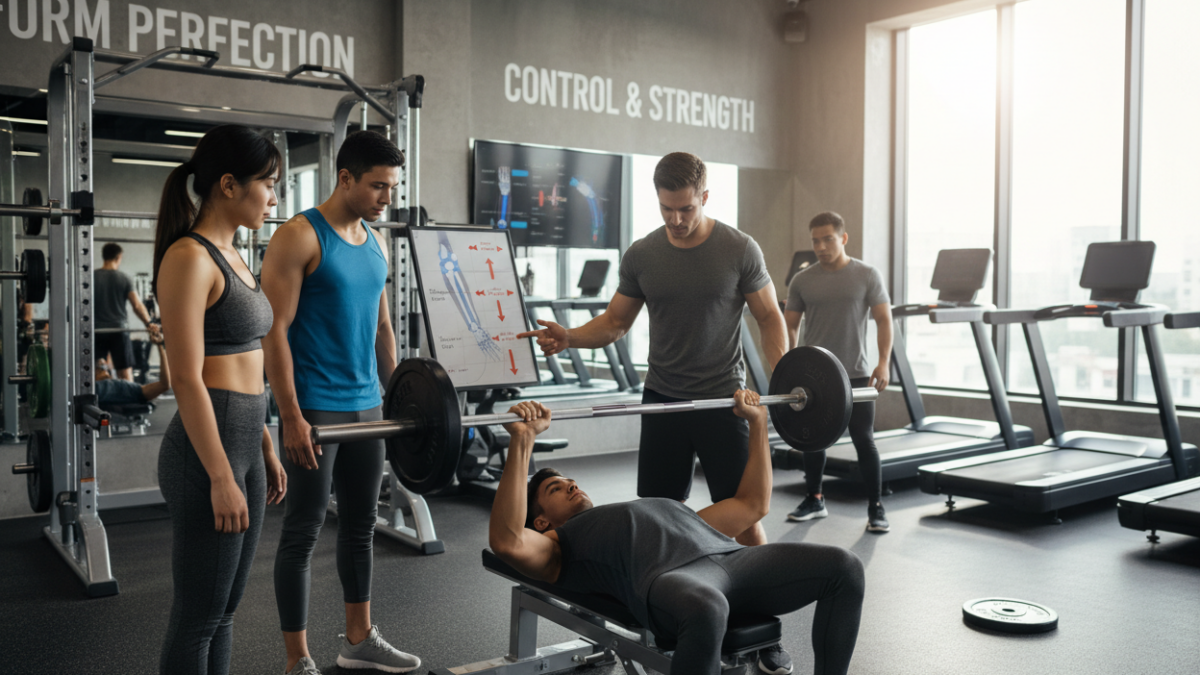
Refine Your Powerlifting Technique for Safer, Bigger Lifts
You came here to lift harder without risking your joints, and that starts with practical, repeatable movement—more leverage, less guesswork.
We’ll skip perfection and focus on small, reliable changes that let your strength show up on heavy attempts.
This guide is for beginners and intermediate lifters who want a clear roadmap: a self-audit, universal setup cues, and lift-by-lift fixes for squat, bench, and deadlift.
Safety first: effort-related discomfort is normal, but sharp joint pain changes the plan immediately.
Use this article as a checklist—pick one issue, apply a single cue, run it for a few weeks, then review video and adjust.
Expect awkwardness at first. New positions feel strange until they become your default. Stick with one change long enough and you’ll feel the payoff in strength and confidence.
Key Takeaways
- Focus on repeatable setup and leverage, not flawless style.
- Follow simple cues and audit your lifts with video.
- Prioritize safety—stop for sharp joint pain.
- Pick one issue, apply one cue, run it for weeks.
- Short-term awkwardness often leads to faster, safer gains.
What “better technique” actually means (and why it adds pounds fast)
Better movement isn’t about looking perfect—it’s about getting more of your effort into the bar every single rep.
Efficiency: stop leaking force
Think of force like water pressure. If your setup leaks—soft brace, knees drifting, or the bar sliding—you never build full pressure.
Common leaks: a rushed setup, a weak brace, bar drift, or knees that shift at the hole. Fixing one leak often gives you an immediate pound gain.
Consistency: build a bar path you can trust
Competition counts on repeatable movement. When you train the same setup and bar path, you reproduce peak performance on heavy attempts.
The best cue is the one you can hit when things get hard, not the fanciest-sounding instruction.
Longevity: train years, not weeks
Joint-friendly choices keep you lifting longer. Small positional changes can cut chronic wear and let you progress week to week.
Practical takeaway: aim for positions you can hold under load, not a one-rep wonder on a great day. That keeps strength rising steadily and the training sustainable.
Start with a quick self-audit before you change anything
Spend two minutes filming and you’ll find the single change that moves the needle. A short audit saves you time and prevents chasing fixes that don’t help performance.
Film setup: angles that show what matters
- Side view — bar path and torso angle.
- 45° view — hip and knee tracking for squat and deadlift setup.
- Front view — symmetry and knee valgus during exercise.
Pick one main limiter and act on it
Decision tree: pain → stop and modify; instability → fix brace/setup; sticking point → target weakness; fatigue → lower volume.
Read performance patterns, not single reps
Watch where you miss. Same spot means a consistent fault in bracing, position, or a weak muscle. If misses vary, it’s likely fatigue or inconsistency in training.
- Squat: check depth on every rep.
- Bench press: watch pause control and bar path.
- Deadlift: spot bar drifting off the shins.
When to bring in coaches: persistent pain, repeated breakdown at moderate loads, or if video review leaves you unsure. Smart self-coaching plus occasional expert input speeds real, safe progress for lifters and powerlifters alike.
Bracing, breathing, and setup cues that carry over to every lift
Start every set by building a solid column from hips to ribs—this one habit cuts leaks and adds pounds.
Stacking your ribs over your pelvis creates a neutral spine you can load safely. Think of it as a strong column versus a bent soda can: the column holds weight, the can crumples.
Stacking ribs over the pelvis
Stand or set in a way that your ribs sit above your hips. That posture keeps your back long and your midsection ready to hold pressure.
What it should feel like: a slight lift in the chest without overextending the lower back. Your trunk becomes a rigid tube that transmits force from legs to bar.
How a belt can teach bracing (not replace it)
Use a belt as feedback. Breathe into your belly and press outward into the belt. If the belt does all the work, your brace is weak.
Practical cue: inhale deep, brace 360°, feel the belt push back, then hold that pressure through the hardest part of the rep.
Creating full-body tension from hands to feet
Tension connects: grip the bar, engage lats, brace the trunk, and drive through the feet. The bar moves because your whole body moves as one unit.
- Inhale into the ribs and belly.
- Brace outward and hold 360° pressure.
- Set grip, pull the bar into you, and plant your feet firm.
Quick setup checklist: ribs stacked, full breath, belt check (if used), tight grip, and feet ready. Run this sequence before any training set and the work you do will transfer to heavier weight safely.
Squat technique that’s strong, legal, and repeatable
Consistency wins: choose a stance, bar placement, and depth you can hit every session. That steady approach builds strength and keeps your training dependable under heavier weight.
Choosing stance width and toe angle for your hips
Pick stance by outcome, not dogma. Wider feet suit longer femurs and allow a more upright torso. Narrower stance helps quad-dominant lifters. Toe angle should let knees track over toes, not flare or collapse.
Bar position basics: high bar vs. low bar without overthinking it
High bar makes you more upright; low bar shortens the range for many lifters. Use the position you can keep tight and confident under load. Don’t force a style that shifts the bar forward off the midfoot.
Depth and control: hitting standards without losing tightness
Control the last few inches—don’t dive bomb. Aim for consistent depth each rep so competition judges see the same squat you train.
Common breakdowns and quick fixes
- Knees caving — tighten hips, cue “push the floor.”
- Hips shooting up — brace down and slow descent.
- Chest collapsing — pull the bar into your back, “stay in the groove.”
| Issue | Likely Cause | Simple Fix | Coaching Cue |
|---|---|---|---|
| Knees cave | Poor hip control | Wider cue, band work, stance tweak | Push the floor |
| Hips up | Weak brace/quad position | Practice braced tempo reps | Brace down |
| Chest falls | Weak upper back, bar path forward | Strengthen lats; keep bar over midfoot | Stay in the groove |
Progression: keep technique work at submax weight until reps look identical across sets, then add weight. Small, repeatable wins stack into real long-term strength.
Bench press technique refinement for safer shoulders and bigger presses
The bench rewards exactness: the smallest setup error shows up on heavy attempts. Nail your base, upper back, and touch point before chasing more weight.
Set your base
Pick a foot position you can keep planted. Drive with your legs to stabilize the torso. If you slide, shorten foot placement or brace harder.
Upper back and arch
Pull your scapulae down and together to make a solid shelf. A stable upper back protects your shoulders under load and lets you press more confidently.
Grip and touch
Stack wrists over elbows and pick a grip that lets you touch the same spot each rep. Aim for a slightly diagonal bar path: down toward the lower chest, back up to nose level.
Practice pauses
Train with commands and pauses. Treat the pause as part of the lift so competition timing never surprises you.
Why precision matters
Westside Barbell calls the bench the most precision-dependent lift. Small errors cost attempts and stress the shoulder. Fix setup before changing load.
| Issue | Likely Cause | Quick Fix | Cue |
|---|---|---|---|
| Shoulder pain | Loose scapular set | Retract and hold scapula | Make a shelf |
| Bar misses high | Wide grip or wrist collapse | Shorten grip; stack wrist | Wrist over elbow |
| Sliding on bench | Poor foot drive | Adjust foot position; press feet into floor | Plant and push |
Deadlift technique that keeps your back happy and your lockout strong
A durable deadlift begins with a repeatable setup that protects the low back while letting your legs do the work. Choose a pull that matches your leverages and training goals. If your hips feel stable and your back stays calm after heavy weeks, that choice is probably right.
Choose your pull by outcome, not style
Sumo often gives a stronger start position and less travel for the bar. Conventional can suit longer backs and simpler hips.
Pick the one where your hips stay low, your spine feels neutral, and the back doesn’t ache after sets.
The wedge and the slack pull
Don’t “rip” the bar. Pull slack out first, lock your lats, then push the floor. That wedge—tension into the bar before the lift—makes the bar break smoothly.
Leg drive before yank
It should feel like a leg-driven push, then the hips pull through. Keep the bar close; it should almost drag your shins without your chest folding forward.
Common fixes
- Hips rising early: reset brace and raise your start slightly so shoulders and hips leave together.
- Bar drifting: tighten lats, keep the bar over midfoot, and resist chest collapse at setup.
- Soft lockouts: finish with glutes, ribs down, no over-lean that strains the back.
| Issue | Cause | Quick Fix |
|---|---|---|
| Hips shoot up | Poor brace / start too low | Set tighter brace; adjust hip height |
| Bar moves forward | Weak lats / chest drops | Pull bar to shins; cue “chest up” |
| Back soreness | Too heavy / sloppy reps | Drop intensity; clean setup; earn weight back |
Simple rule: if your back gets angry, reduce weight, fix setup, and rebuild strength with consistent reps.
How to use variations without turning your training into chaos
Treat variations like targeted tools: pick one and use it with purpose. That keeps your work focused and transfers back to the main lifts.
When a variation is truly specific
Specific means the exercise fixes the exact limiter you found on video while still looking like the competition lift. If it changes your movement too much, it’s not specific.
Simple first, complex later
Start with basic variations you can perform cleanly. Front squat helps posture and quads. Close-grip bench press targets triceps and lockout. Deficit pulls build speed off the floor for the deadlift.
Rules to prevent chaos
- Keep the competition lift in your plan weekly.
- Rotate only one main variable at a time: variation, load, or reps.
- Run a variation for weeks, not days, then reassess with fresh video.
| Variation | Primary benefit | When to use |
|---|---|---|
| Front squat | Improves posture and quad strength | Use for chest collapse or upright squat needs |
| Close-grip bench press | Strengthens triceps; stabilizes lockout | Use when bar stalls mid-press or wrists fall |
| Deficit deadlift | Builds first-pull speed | Use when bar drifts or you lose momentum off floor |
Quick pick: match the variation to the exact spot your movement breaks on video. If it doesn’t transfer in weeks, try a simpler exercise or go back to the main lift.
Accessory work that actually supports the big three (not just more fatigue)
The right accessory choices turn weak spots into reliable strength. Accessories should build the positions and muscle you need to express the competition lifts, not just add tired sets.
Why many strong programs run heavy accessory volume
Programs like Westside frame about 80% of work as targeted accessory to build the base. That doesn’t mean random volume. It means focused exercises that raise your ceiling while protecting joints.
Multi-joint vs. single-joint: smarter sequencing
Do your biggest multi-joint accessory first when energy is highest. Follow with single-joint work to finish weak links. This order gives strength gains without wrecking technique on the main lifts.
Practical accessory menus
- Squat/deadlift stability: back raises, rows, good mornings, and plank/bracing drills.
- Bench durability: close-grip presses, heavy rows/pulldowns, and face pulls or lateral raises.
| Goal | Primary exercise | When to use |
|---|---|---|
| Posterior chain | Back raises / good mornings | Early in session |
| Trunk stability | Paloff press / plank variations | After heavy sets |
| Bench durability | Close-grip press / rows | Weekly, low fatigue |
Fatigue filter: if accessory work wrecks your next main session, cut volume or swap to less costly exercises. Smart accessory choices create steadier positions, stronger lockouts, and fewer mystery aches over time.
powerlifting technique refinement through better training organization
Structure your work so new positions get time to become habits, not one-day experiments. Periodization is just ordering stress over time so progress keeps happening.
Micro, meso, macro—what to do when
Microcycle ≈ one week. This is your shopping list: exact sets, reps, and load for each workout.
Mesocycle ≈ 2–8 weeks. This is where you run a focused plan to fix a weak link or build volume.
Macrocycle ≈ 12–16+ weeks. This is a full prep block or off-season that sets the time you need to peak.
Linearity: earn the right to add weight
Progress should feel earned. Add load only when reps are clean. That keeps your positions repeatable and your performance reliable.
Undulation: vary stress within a week
If you squat or bench multiple times, change load, reps, or tempo between sessions. One heavy day and one lighter skill day preserves quality without killing volume.
Conjugation: rotate to attack weak points
Rotate variations monthly to avoid accommodation. Keep the main lift obvious, but use targeted swaps to build missing strength.
- Keep one heavy session per lift each week.
- Add one technique-focused session with lower load.
- Rotate a variation monthly for a specific weak link.
| Scale | Duration | Focus | Example |
|---|---|---|---|
| Microcycle | 1 week | Session detail, recovery | Heavy bench day + light pause day |
| Mesocycle | 4 weeks | Address limiter, manage volume | Monthly triceps variation rotated |
| Macrocycle | 12–16 weeks | Peak or build base | Meet prep with reduced variation |
One-week example: Day 1 heavy bench (3–5 reps), Day 3 light technique bench (6–8 reps, pause), accessory triceps work day. Run that pattern for 4–6 weeks, then reassess.
Don’t join a single-team mindset. The best plans blend linear growth, weekly undulation, and smart rotation over time. That’s how athletes keep improving without breaking down.
Rep ranges, intensity, and technique: getting strong without practicing ugly reps
The right rep ranges help you practice force without teaching bad habits under load. Use low reps to train maximal recruitment and higher reps to build muscle and joint-friendly volume.
Why 1–6 reps matter
Low reps teach your nervous system to recruit motor units and express near-max force. Heavy sets in this range build max strength and make your top lifts more reliable.
Why 8–12 reps still belong
Moderate reps grow muscle mass, increase work capacity, and build connective tissue tolerance. They add volume you can handle without beating your joints to pieces.
Match intensity to the goal
Use lighter loads and clean reps for skill practice. Reserve true max effort for sessions when you can keep all setup and bar path tight.
Stop rules & form standards
End a set when bar speed drops markedly, a position shifts, or pain appears. Your standards: same start position, the same bar path target, consistent bracing, and no ignored pain signals.
| Range | Primary Benefit | Use When |
|---|---|---|
| 1–3 | Max strength, neural drive | Peaking, testing |
| 4–6 | Strength with some volume | Building heavy density |
| 8–12 | Muscle mass, endurance, joint-friendly volume | Hypertrophy blocks |
Practical note: periodize these ranges and follow a simple rule: don’t rehearse breakdowns. For more guidance on structuring reps and loads, see our rep range guide.
How to undulate within the week while keeping the skill fresh
Plan your week so each session builds skill without piling up fatigue. Undulation gives you clear jobs for each day: one heavy to test strength and one lighter to polish speed and setup.
Heavy day / lighter day setups that still drive progress
Heavy day: low reps, higher intensity, practice bar speed under load. This is your strength rehearsal.
Lighter day: lower load, higher quality reps, focus on exact setup, tempo, and cleaner volume. Think speed and consistency, not failure.
Rotate stress, not identity: variations vs. load vs. reps
Keep the same main lift but change one variable. Swap load one day, reps the next, or use a targeted variation instead of full intensity on both days.
- Rotate load: 85% x3 early, 70% x5 later.
- Rotate reps: triples versus sets of five for practicing groove.
- Use variations sparingly so the main lift stays familiar.
When daily undulation makes sense for squat and bench frequency
For squat, try heavy triples Tuesday and lighter 5s Friday with the same stance and depth. That repeats the setup while managing volume and time under tension.
For bench, run one paused meeting-style day and one volume day that sharpens bar path and grip. If you want a deeper read on bench choices, see our bench press comparison.
Deadlift often needs lower frequency. Favor one heavy pull per week and a second session of speed pulls or targeted secondary work to preserve technique without excess fatigue.
| Session | Focus | Example |
|---|---|---|
| Heavy | Strength | 85% × 3, 3 working sets |
| Light | Skill/volume | 70% × 5, 4 sets with strict form |
| Accessory | Support | Target weak points, low fatigue |
Goal: practice the lift often so your setup becomes automatic, but protect volume so technique stays clean and your training is sustainable.
Dialing up specificity as competition approaches (without losing your base)
As the meet date nears, your days should lean toward doing fewer things and doing the right things very well. The main shift is simple: cut distractions and practice meet-style work so your best reps become automatic.
Reduce big swings and excess variation
Drop wild undulation and random PR attempts. That means fewer novel exercises and fewer surprise heavy days that change bar timing.
Keep variation minimal so your squat, bench press, and deadlift feel the same on every attempt day.
Practice realistic attempts, commands, and timing
Rehearse singles that match your opener: same stance, same touch, same command. Treat each practice attempt like a rehearsal, not a strength test.
Include short sets under mild fatigue so you learn to stay tight when you’re not fresh. That’s what meet time feels like.
Use “circa-max” work to bridge the gap
Replace constant speed work with heavier secondary sets near 90–95% of what you plan to open with. This bridges heavy feeling without living at true maximal load.
Circa-max sessions prepare nerves and joints while keeping recovery manageable. Peak by expressing the strength you already built—not building new strength in the last weeks.
- Do: practice meet commands and single attempts regularly.
- Don’t: chase random PRs or add variations that change your bar path.
- Use: circa-max sets and smart fatigue practice to nail execution.
Keep calm execution and safety the priority. Time your taper so your weight and bar feel predictable on the platform, and you’ll turn training gains into meet-day performance.
For guidance on managing rep speed and load in these final weeks, see our rep tempo and load planning.
Safety and longevity: technique fixes that reduce injury risk
Protecting your long-term health means spotting the warning signs and acting before a small ache becomes a sidelining injury. Treat pain as data and use simple steps that let you keep training while you fix the issue.
Red flags that mean “change the plan today”
- Sharp joint pain during a rep.
- Pain that forces you to change your movement pattern.
- Numbness or tingling that travels into an arm or leg.
- Pain that worsens set to set instead of easing.
Immediate actions: stop the aggravating lift, reduce range or load, switch to a tolerable variation, and reassess after a short recovery period. If pain persists, consult a medical or rehab professional.
Managing fatigue so issues aren’t just exhaustion
Fatigue disguises breakdown: your brace slips, your bar path wanders, and small errors compound. Don’t try to fix that by forcing heavy attempts.
Use these levers:
- Reduce weekly volume when feel is poor.
- Keep intensity but cut the number of sets to protect form.
- Or keep sets but lower load so positions stay crisp.
These choices let you keep training while you protect your back, joints, and overall strength progress.
Equipment choices: sleeves, wraps, and belts as tools — not crutches
Sleeves and wraps can reduce wear and offer joint support. A belt teaches bracing and gives useful feedback when used correctly.
Quick rule: use gear to assist consistent positions, not to hide poor setup or reckless effort. Your base bracing and setup still matter most for long-term gains.
| Problem | Short fix | When to get help |
|---|---|---|
| Sharp joint pain | Stop lift; switch variation; ice/brief rest | Pain after 72 hours or worsening |
| Technique collapse from fatigue | Cut sets or load; add recovery day | If issues repeat despite rest |
| Chronic back soreness | Deload; check hip hinge and brace; use lighter work | Persistent pain or neurological signs |
Long game reminder: consistent training beats heroic single sessions. If you’re a beginner or intermediate lifter, prioritize reliable progress over risky, one-off lifts. Seek a coach or clinician when pain changes your movement or won’t settle—getting help early saves time and strength.
Track what matters so technique changes stick
Changing how you train only helps if you measure a few simple signals. Don’t track everything — track what leads to faster decisions and better lifts over time.
![]()
Simple metrics to actually use
- RPE: note how hard sets feel. Use it to adjust load and avoid chasing ugly reps.
- Bar speed feel: a quick note — fast, steady, or slow — tells you if a lift is moving like it should.
- Setup consistency: yes/no on whether your stance, grip, and brace matched rep to rep.
Video review checklist by lift
- Squat: consistent depth and bar over midfoot every rep.
- Bench: same touch point and controlled pause on heavy singles.
- Deadlift: clean slack pull and the bar close to the shins through the pull.
Keep, ditch, or ask a coach
A cue is a tool. Keep it if it boosts performance and makes setups repeatable for several weeks under real training loads.
Ditch a cue if it fixes one thing but breaks two others — for example, deeper depth that causes knee slide or loss of chest position.
Ask coaches when progress stalls despite consistent practice, when pain repeats, or when your self-audit can’t find the true limiter. Coaches add perspective and help speed up the solution.
| What to track | Why it matters | Action next |
|---|---|---|
| RPE / bar speed feel | Shows readiness and performance on a set | Lower load or repeat cue if speed drops |
| Setup consistency | Keeps reps reproducible under load | Hold cues for 2–4 weeks or replace if harmful |
| Video checklist | Reveals true limiter vs. symptom | Pick one limiter; target with a variation or accessory |
Conclusion
Cleaner setups let your strength show up more often and cost your body less over time.
Start with a quick video audit, fix one limiter, and build universal bracing. Then refine squat, bench press, and deadlift cues slowly so the change sticks.
Organize your training around a repeatable weekly plan. Use smart volume, one heavy session, one skill day, and enough recovery to keep positions stable.
Pick exercises and variations with purpose. Use them to solve a clear problem, not to chase novelty. That keeps work transferable to the main lifts.
Next workout: choose one lift, pick one cue, film two sets, and stop when form drops. That simple loop creates real progress.
Expect steady gains, not instant perfection. Aim for repeatable, meet-ready reps that hold up when the bar gets heavy and your strength counts.